Кластер из raspberry pi 3. Параллельные вычисления на raspberry pi
Сегодня речь пойдёт о замечательном инструменте, а именно о контейнерной системе развертывания приложений - Docker. Разработчиков для Raspberry Pi тема касается непосредственно. Добро пожаловать под кат.
1. Что такое Docker
Возможно не все знакомы с системами развертывания. Поэтому я поясню.
Говоря совсем простым языком, Docker - это такая система, которая позволяет один раз настроить приложение на одной машине, сохранить его окружение (не только конфигурацию, а именно и окружение тоже) и зависимости, дальше распространять его уже настроенным в виде контейнера. Т.е. для развертывания ничего не понадобится кроме образа.
Также вы можете где-нибудь увидеть слова "Docker" и "виртуализация" в одном предложении, это не значит что Docker эмулирует процессор, память, ядро ОС и т.д., виртуализация происходит на уровне ядра т.е. все "виртуализируемые" им процессы являются реальными процессами вашей ОС.
Как вы уже догадались можно придумать массу применений. Например, вы собираетесь сделать кластер Raspberry Pi, который будет майнить биткоины (кстати, это нерентабельно в наши дни) и на каждую из 1000 имеющихся в арсенале плат вы должны установить и настроить один и тот же софт. Да, можно скомпилировать свой образ ОС, но это во-первых не так быстро, во-вторых это не так гибко (конфигурация чуть-чуть поменялась и надо пересобирать весь образ ОС).
Или, например, вы хотите распространять ваше приложение под несколько модификаций одноплатных компьютеров: Rpi1, Rpi2, O-droid, Rpi3. Везде одна и та же структура приложения, один и тот же исполняемый код, но конфигурация отличается. Вы можете создать 3,4 отдельных мануала для пользователей по установке и настройке, а потом вам это надоест и вы создадите N различных, уже настроенных конфигураций вашего приложения под самые популярные платформы и будете распространять их виде контейнеров.
Это то что я придумал навскидку. На самом деле Docker это очень-очень мощный инструмент, применений ему можно найти неограниченное количество.
Самым большим плюсом является то, что развернуть контейнер можно на абсолютно любой другой машине где установлен Docker.
Ладно, вводная часть что-то слишком затянулась. Перейдем к делу.
2. Установка
Если вы устанавливаете систему с нуля, то возможно рациональнее воспользоваться уже готовым образом от команды Hypriot.
Большинство пользователей не будет переустанавливать систему из-за того что хотят попробовать Docker. Поэтому ниже будет приведен процесс установки на Raspbian.
0. Если у вас старая версия Raspbian, обновляемся до новой т.к. с версии Debian 8 появилась поддержка ядра Docker "из коробки":
$ sudo sed -i "s/wheezy/jessie/" /etc/apt/sources.list $ sudo sed -i "s/wheezy/jessie/" /etc/apt/sources.list.d/raspi.list $ sudo apt-get update && sudo apt-get -y upgrade # answer "y" to upcoming questions $ sudo sudo apt-get -y dist-upgrade # answer "y" to upcoming questions $ sudo init 6 $ sudo apt-get -y autoremove $ sudo apt-get -y purge $(dpkg -l | awk "/^rc/ { print $2 }") $ sudo init 6
1. На официальном сайте отсутствует мануал с описанием установки на Raspberry Pi, но команда Hypriotпроделала большую работу по автоматизации установки Docker на Raspberry. Воспользуемся плодами их труда:
$ git clone https://github.com/hypriot/rpi-docker-builder.git $ cd rpi-docker-builder $ sudo sh build.sh $ sudo sh run-builder.sh
После этого пакет для установки Docker вы найдете в каталоге./dist/docker-hypriot_1.10.3-1_armhf.deb. На данный момент это последняя версия.
Ленивые могут воспользоваться готовыми пакетами от Hypriot:
$ curl -sSL http://downloads.hypriot.com/docker-hypriot_1.10.3-1_armhf.deb >/tmp/docker-hypriot_1.10.3-1_armhf.deb $ sudo dpkg -i /tmp/docker-hypriot_1.10.3-1_armhf.deb $ rm -f /tmp/docker-hypriot_1.10.3-1_armhf.deb $ sudo sh -c "usermod -aG docker $SUDO_USER" $ sudo systemctl enable docker.service
2. Проверка работоспособности
Sudo docker info
Docker version
Выведет информацию о версии, количестве контейнеров, версии ядра, драйверов и т.д.
3. Теперь любое приложение, которое есть в виде docker-контейнера для ARM, можно устанавливать с помощью docker run на Raspberry Pi.
Следующая команда скачает и развернёт небольшой уже настроенный веб-сервер:
Docker run -d -p 80:80 hypriot/rpi-busybox-httpd
Список контейнеров можно посмотреть с помощью
Docker ps
3. Использование
Можно, конечно, описывать основные команды и прочее, но за этим лучше обращаться к документации.
Поэтому мы рассмотрим на примере.
Предположим мы хотим собрать контейнер в котором будет веб сервер NGinx и PHP 5.4.
В начале пишется инструкция по сборке образа. Листинг файла с комментариями приведен ниже.
src: build/backend/Dockerfile
# Используем за основу контейнера Ubuntu 14.04 LTS FROM ubuntu:14.04 # Переключаем Ubuntu в неинтерактивный режим - чтобы избежать лишних запросов ENV DEBIAN_FRONTEND noninteractive # Устанавливаем локаль RUN locale-gen ru_RU.UTF-8 && dpkg-reconfigure locales # Добавляем необходимые репозитарии и устанавливаем пакеты RUN apt-get install -y software-properties-common RUN add-apt-repository -y ppa:ondrej/php5-5.6 RUN add-apt-repository -y ppa:nginx/stable RUN sudo apt-key adv --keyserver keyserver.ubuntu.com --recv-keys 4F4EA0AAE5267A6C RUN apt-get update RUN apt-get upgrade -y RUN apt-get install -y wget curl php5-fpm php5-mysql php5-gd php5-curl php-pear php-apc php5-mcrypt php5-imagick php5-memcache supervisor nginx # Добавляем описание виртуального хоста ADD iloverpi.ru /etc/nginx/sites-enabled/iloverpi.ru # Отключаем режим демона для Nginx (т.к. запускать будем сами) RUN echo "\ndaemon off;" >> /etc/nginx/nginx.conf # Отключаем режим демона для php-fpm RUN sed -i -e "s/;daemonize\s*=\s*yes/daemonize = no/g" /etc/php5/fpm/php-fpm.conf # Добавляем конфиг supervisor (описание процессов, которые мы хотим видеть запущенными на этом контейнере) ADD supervisord.conf /etc/supervisor/conf.d/supervisord.conf # Объявляем, какие директории мы будем подключать VOLUME ["/var/www"] # Объявляем, какой порт этот контейнер будет транслировать EXPOSE 80 # Запускаем supervisor CMD ["/usr/bin/supervisord"]
src: build/backend/supervisord.conf
Nodaemon=true loglevel=debug command=/usr/sbin/nginx autorestart=true command=/usr/sbin/php5-fpm autorestart=true
Полный список команд с пояснениями доступен по ссылке .
Теперь, используя эту инструкцию, собираем образ iloverpi.ru.
Sudo docker build -t iloverpi.ru ~/PATH_TO_DOCKERFILE_DIR
Образ iloverpi.ru надо запустить, тем самым создав контейнер. Помимо этого требуется связать 80 порт хоста с 80 портом контейнера. Для удобства и полноты примера также свяжем /var/www хоста и /var/www контейнера.
$ sudo docker run -v /var/www:/var/www -p 80:80 -м -t iloverpi.ru
Убеждаемся что контейнер запущен:
Sudo docker ps | grep "iloverpi.ru"
Имя контейнера не было указано явно, поэтому он получил автоматическое название, с помощью которого мы можем с ним взаимодействовать.
У меня вывод предыдущей команды выглядит так:
D8429cc192c0 astgo.ru/dev:latest "/usr/bin/supervisor 20 seconds ago Up 19 seconds 0.0.0.0:80->80/tcp container23
Здесь "container23" - имя контейнера.
Для взаимодействия с командной строкой контейнера существует команда
Sudo docker exec -i -t container23 bash
После этого станет доступно обычное приглашение командной строки. Это и будет консоль нашего контейнера.
Итак, мы собрали и развернули свой контейнер, научились с ним взаимодействовать.
Статья получилась длинной, но надеюсь Вам было интересно. До новых встреч.
Вполне возможно, что это самый дешёвый и доступный кластер, построенный в домашних условиях.
В данный момент он считает задачки seti@home.
Сборка
Сборка не составляет особого труда - вот список материалов для повторения:
- 4 платы OrangePi PC (One тоже подойдет) с кабелями питания
- 16 стоек для печатных плат для крепления между собой
- 4 стойки (коротких) для крепления на подставку или использования в качестве ножек
- 2 куска оргстекла (верхняя и нижняя крышка)
- Вентилятор 92 мм
- 4 уголка для крепления вентилятора
- 100Mbs Ethernet HUB, желательно с питанием либо 5, либо 12 вольт
- Патчкорды для соединения Ethernet в необходимом количестве (кстати, поскольку сеть все равно 100 МБит, можно использовать 4х-жильную телефонную лапшу и немного сэкономить на кабеле)
- Источник питания (об этом позже)
- Для связи с внешним миром - дешёвый USB WiFi
Скручиваем вместе четыре платы, крепим верхнюю и нижнюю крышки, ставим вентилятор с использованием уголков. На верхнюю крышку водружаем хаб и соединяем наш всё вместе через Ethernet.
А вот так “изделие” выглядит “с тыльной стороны”.

К сожалению, синей изоленты не было - так что хаб крепим резиночками.
Питание
Каждая из OPI потребляет не меньше ампера (производитель рекомендует источник не меньше 1.5…2A). Вентилятор требует 12 вольт, хаб тоже, хотя бывают и 5-вольтовые модели.
Так что потребуется хороший источник питания с двумя напряжениями.
Старый компьютерный вполне подойдет, но лучше использовать современный безвентиляторный импульсный источник, например от MeanWell.
Я, собственно, так и поступил, упаковав его в корпус от винтажного блока питания и выведя наружу обычный молекс-разъем (как на компьютере).

Для “раздачи” 5ти вольт будем использовать модифицированный USB-хаб из дешевых. Для этого можно либо высверлить чип, либо просто отрезать ножки данных, оставив только цепи питания и землю. Я остановился на втором способе, правда внутри проложил еще “толстые” соединения на линии 5В. Ну и повесим ответный molex для соединения с БП. Получается примерно так:

А вот вся конструкция в сборе:

Система
Вообще, это просто “маленькая локальная сеть из 4х компьютеров”.
В качестве базовой системы - обычный Debian, о котором уже много говорили .
Сеть
Самый верхний узел - clunode0, он умеет соединяться по WiFi с внешней сетью, при этом раздает “интернет” на машины clunode1, clunode2, clunode3. Там же работает сервер NFS для общего хранилища и dnsmasq для раздачи DHCP адресов вида 10.x.x.x.
На clunode0 в /etc/network/interfaces примерно такая запись:
| 1
2 3 4 5 6 7 8 9 10 11 12 13 | auto wlan0
allow-hotplug wlan0 iface wlan0 inet dhcp wpa-scan-ssid 1 wpa-ap-scan 1 wpa-key-mgmt WPA-PSK wpa-proto RSN WPA wpa-pairwise CCMP TKIP wpa-group CCMP TKIP wpa-ssid "MyWiFi" wpa-psk "MyWiFiPassword" post-up /usr/local/bin/masquerade.sh eth0 wlan0 iface default inet dhcp |
Хотя, вроде как там ситуация переломилась и бинарник можно сгрузить с сайта. Не проверял - проще было собрать самому.
Еще можно установить и настроить консольную утилиту boinctui . Выглядит всё вполне пристойно (animated GIF):

Перспективы
Можно развить идею - вот навскидку несколько идеек:
- Первая плата (clunode0) - load balancer, сlunode2,3 - веб-сервера или приложение, clunode4 - БД ==> микродатацентр:)
- Hadoop (и такие случаи уже есть, народ строит кластеры на Raspberry)
- Proxmox кластер, правда я не уверен, что все запчасти доступны для ARM
- Майнер cryptocurrency, если конечно подберете криптовалюту, которую всё еще выгодно майнить на процессоре и выгодно майнить вообще.
Спасибо, что дочитали до конца.
In today’s guest post, Bruce Tulloch, CEO and Managing Director of BitScope Designs , discusses the uses of cluster computing with the Raspberry Pi, and the recent pilot of the Los Alamos National Laboratory 3000-Pi cluster built with the BitScope Blade .
High-performance computing and Raspberry Pi are not normally uttered in the same breath, but Los Alamos National Laboratory is building a Raspberry Pi cluster with 3000 cores as a pilot before scaling up to 40 000 cores or more next year.
That’s amazing, but why?
Traditional Raspberry Pi clusters
Like most people, we love a good cluster! People have been building them with Raspberry Pi since the beginning, because it’s inexpensive, educational, and fun . They’ve been built with the original Pi, Pi 2, Pi 3, and even the Pi Zero, but none of these clusters have proven to be particularly practical.
That’s not stopped them being useful though! I saw quite a few Raspberry Pi clusters at the conference last week.
One tiny one that caught my eye was from the people at openio.io , who used a small Raspberry Pi Zero W cluster to demonstrate their scalable software-defined object storage platform , which on big machines is used to manage petabytes of data, but which is so lightweight that it runs just fine on this:

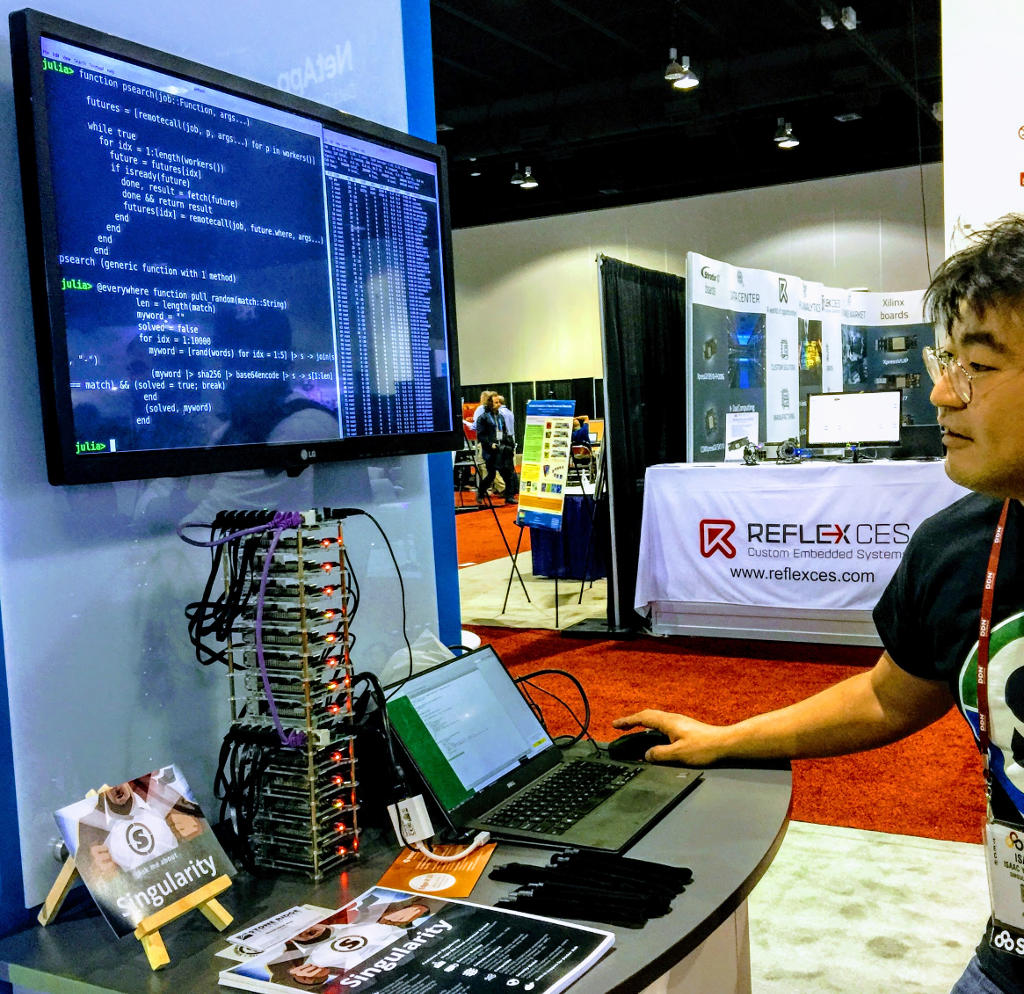
There was another appealing example at the ARM booth, where the Berkeley Labs’ singularity container platform was demonstrated running very effectively on a small cluster built with Raspberry Pi 3s.
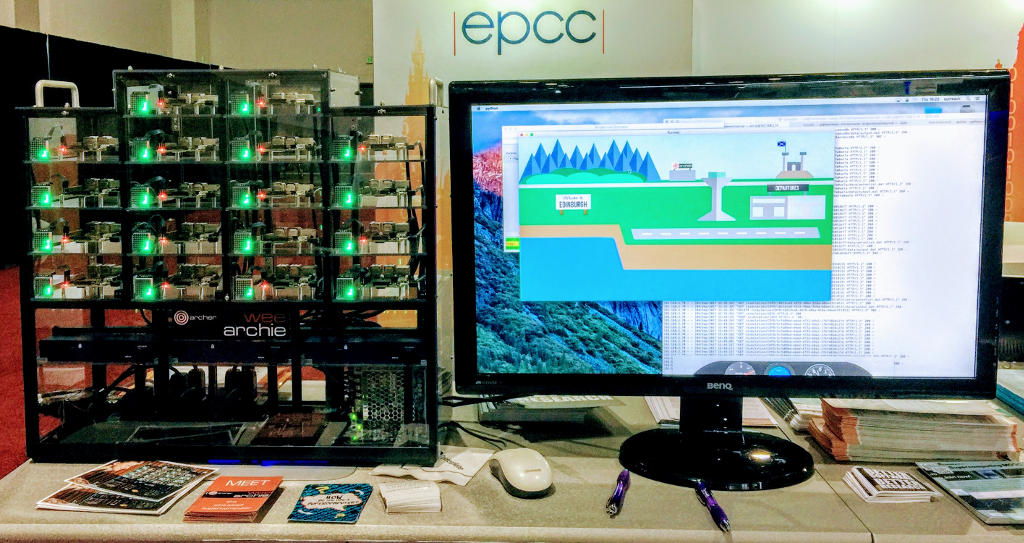
My show favourite was from the Edinburgh Parallel Computing Center (EPCC): Nick Brown used a cluster of Pi 3s to explain supercomputers to kids with an engaging interactive application. The idea was that visitors to the stand design an aircraft wing, simulate it across the cluster, and work out whether an aircraft that uses the new wing could fly from Edinburgh to New York on a full tank of fuel. Mine made it, fortunately!
Next-generation Raspberry Pi clusters
We’ve been building small-scale industrial-strength Raspberry Pi clusters for a while now with BitScope Blade .
When Los Alamos National Laboratory approached us via HPC provider SICORP with a request to build a cluster comprising many thousands of nodes, we considered all the options very carefully. It needed to be dense, reliable, low-power, and easy to configure and to build. It did not need to “do science”, but it did need to work in almost every other way as a full-scale HPC cluster would.
I’ll read and respond to your thoughts in the comments below this post too.
Editor’s note:
Here is a photo of Bruce wearing a jetpack. Cool, right?!

16 comments
What’s wrong with using the switch and ethernet fabric as the “bus” on the existing hardware?
That’s a good idea. I think the time is right.
The EPCC Raspberry Pi Cluster is called Wee Archie () and it (like the Los Alamos one we built) is a “model”, albeit for a somewhat different purpose. In their case it’s representative of Archer (http://www.archer.ac.uk/) a world-class supercomputer located and run in the UK the National Supercomputing Service. Nick Brown (https://www.epcc.ed.ac.uk/about/staff/dr-nick-brown) is the guy behind the demo I saw at SC17. Drop him a line!
One of the pending issues with exascale computing is that it is inefficient to checkpoint a computation running on so many cores across so many boxes. At the same time, the probability that all nodes function faultlessly for the duration of the computation decreases exponentially as more nodes are added.
Effectively utilizing distributed memory parallel systems has been compared to herding chickens. When contemplating flocks so large that it takes megawatts to feed them, it may be better to practice by herding cockroaches. This isn’t about performance tuning Fortran codes, but how to manage hardware faults in a massively distributed parallel computation. As mentioned in the press release, we don’t even know how to boot an exascale machine: By the time the last node boots, multiple other nodes have already crashed. In my opinion modelling these exascale difficulties with a massive cluster of Raspberry Pi computers is feasible. For example, dumping 1GB of RAM over the Pi’s 100Mbit networking is a similar data to bandwidth ratio as dumping 1TB of RAM over a 100Gbit interconnect.
Spot on Eric. The issue is one of scale, booting, running the machines, getting the data in and out and check-pointing to avoid losing massive amounts of computational work.
Some interesting things I learned from this project…
One normally thinks of error rates of the order of 10^-18 as being pretty good, but at this scale one can run into them within the duration of a single shot on a big machine. At exascale this will be worse. The word the HPC community uses for this is “resilience”; the machines need to be able to do the science in a reliable and verifiable way despite these “real world” problems intervening in the operation of the underlying cluster.
They do a lot of “synchronous science” at massive scale so the need for check-points is unavoidable and Los Alamos is located at quite a high altitude (about 7,300 feet) so the machines are subject to a higher levels of cosmic radiation. This means they encounter higher rates of “analogue errors” which can cause computation errors and random node crashes.
All these sorts of problems can be modelled, tested and understood using the Raspberry Pi Cluster at much lower cost and lower power than on big machines. Having root access to a 40,000 core cluster for extended periods of time is like a dream come true for the guys who’s job is to solve these problems.
Not LFS but not Raspbian either (except for initial testing). They will eventually published more to explain what they’re doing but suffice to say it’s a very lean software stack which is aimed to make it easy for them to simulate the operation of big clusters on this “little” one.
When running a cluster of 750 nodes (as Los Alamos are doing), managing and updating images on all 750 SD card is, well, a nightmare.
If your cluster is smaller it may not be a problem (indeed we often do just this for small Blade Racks of 20 or 40 nodes).
However, the other issue is robustness.
SD cards tend to wear out (how fast depends on how you use them). PXE (net) boot nodes do not wear out. Local storage may also not be necessary (if you use an NFS or NBD served file system via the LAN) but the bandwidth of accessing the (remote) storage may be a problem (if they all the nodes jump on the LAN at once depending on your network fabric and/or NFS/NBD server bandwidth).
The other option are USB sticks (plugged into the USB ports of the Raspberry Pi). They are (usually) faster and (can be) more reliable than SD cards and you can boot from them too!
All that said, there is no problem with SD cards used within their limitations in Raspberry Pi Clusters.
You guys need to start making a computer “erector set”. As a kid, I received an erector set when I was 7-8 years old for Christmas. I made everything one could think of. I later became a Mechanical Engineer. I designed parts for GE Gas Turbines, and when you switch on your lights, I have a direct connection to powering RPis all over the world.
You have most of the fundamental parts right now. You need a bus, something like the CM DDR3 bus. If the RPi 3B or whenever the RPi 4 comes out, had an adaptor or pinouts that connected to that bus, Clustering would be easy. I could envision four quad processor CMs, a graphics processor/Bitcoin miner on a CM, a CM with SSD, etc. A computer erector set…
Is there a short video presentation available that discusses the Los Alamos Pi cluster, how it was constructed, what it will be used for and why this solution was chosen over others?
Also, given the interest in OctoPi and other Pi clusters, could there be a section devoted to parallel processing in the Raspberry Pi Forum?
Is the airwing demo free available?
I’m glad I left their high performance computing department now. This is madness. The Fortran code bad so prevalent at the labs is not going to run the same on the ARM architecture when the super computers the code is to run on will be used on Intel architecture machines. This project is going to give the interns a playing field to learn what they should have learned in college.
I make 120 Raspberry Pi clusters for 3D scanning. Use pure UDP multicasting to control them all using a single network packet transmission. Works really well:-)
That’s very similar with what we want with a new grass roots project. But instead of a cluster physical near located, We are thinking of a ‘collective’ (kind of Borg, but then nice…), for doing Three.js GPU 3D rendering. I’ve got a prototype running on If you Bing or Google on sustasphere, you will find the corresponding GitHub (not completely up to date however). The current prototype renders (obviously) in your browser. With the collective, your browser-calls will be routed to (hopefully) thousands of Raspberry’s; each crunching real-time a part of the 3D rendering. In ‘my head’, I’m thinking about Open Suze stacked with Express.js.
For the energy-supply of each node, we thank the wind and an archemedian screw, with an hydraulic head, with a simple bicycle dynamo…
Nice, but why? We would like to honor an echo from the past (The Port Huron Statement); introduce a virtual sphere of dignity. Giving people the opportunity to express their emotions; again defining the meaning of dignity. Imagine Mozart performing his Nozze di Figaro (for me a perfect example of bringing art to the people and sharing thoughts about morality); and being able to actualy be there, move around, ‘count the nostrils’ and maybe even ‘get physical’.
Yep, you’ll need some GPU-collective for that.
Based on your expierence, could you advise us on our road ahead? Help use make sound decisions?
> recent pilot of the Los Alamos National Laboratory 3000-Pi cluster
It should read 750-Pi cluster, 5 blades of 150 Pis each, with 3000 cores total (4 cores each per CPU)
Ok, I’m a nuby on raspberry pi 3’s. But I was wondering if they used LFS with the bitscope blade cluster? …and if so, how did it perform?
Why is it “important to avoid using the Micro SD cards” ?
I have an application in mind for a pi cluster, for which I will need local storage. If I can’t use the MicroSD card, then what?
Raspberry Pi 3 возможно назвать по-настоящему универсальным компьютером. Bitcoin, конечно, на нём намайнить не получится, да и в игры с графикой консолей последних поколений поиграть не выйдет, но вот со многим остальным он хорошо справится. Ниже, в свою очередь, будет рассмотрены основные и наиболее популярные варианты применения Raspberry Pi 3.
Мультимедийные возможности Raspberry Pi 3
Возможности Raspberry Pi 3 в области мультимедиа очень велики. В частности, на основе "Малины" можно сделать мультимедийный центр, игровую консоль либо даже всё сразу. В результате с этим одноплатником можно получить на своем телевизоре с HDMI-портом доступ к следующим категориям развлечений:
- видео в высоком разрешении на YouTube или других хостингах;
- музыке на стриминговых сервисах;
- игровым стримам на, например, Twitch;
- играм, разработанным для старых консолей : NES, SNES, SEGA и др.
Чтобы просматривать и прослушивать мультимедийный контент, можно либо использовать браузер, либо, что еще более удобно - установить специальный медиаплеер. Наиболее функциональным и удобным из них является Kodi .
Для превращения "Малины" в игровую консоль нужно поставить на неё эмуляторы интересующих платформ и заказать игровые Rom-ы. Это делается за пару десятков минут. А еще проще и удобнее - инсталлировать специальный дистрибутив, например, Retro Pie или какой-то другой.
Разработка и работа с документами на RPi
Конечно, "Малина" - не самый мощный компьютер, а значит - не лучшее решение для работы. Но при желании на ней более или менее комфортно можно посмотреть/отредактировать какой-то документ или даже написать скрипт. Конечно, работать с тяжелыми IDE на ней не получится, но этого от RPi никто и не требует.
Также с помощью RPi3 можно «посерфить» в интернете или пообщаться в мессенджерах либо социальных сетях.
Сервер для любых нужд из Raspberry Pi 3
Еще один вариант, как можно использовать Raspberry Pi 3 - это сделать из него сервер. Так, достаточно поставить на него LAMP или просто Apache и Myphpadmin, после чего можно будет разрабатывать и тестировать веб-проекты в условиях достаточно ограниченных ресурсов.

Второй вариант - скачивать и раздавать с Raspberry Pi 3 torrent. Для этого, конечно, потребуется внешний жесткий диск, так как карты памяти и флэшки для данных целей не очень подходят как из-за ограничений скорости и маленького объема, так и ввиду быстрой изнашиваемости при интенсивных нагрузках.
Применение "Малины" в робототехнике и IoT
В IoT и робототехнике применение RPi практически безгранично. Из этого устройства можно сделать, например, камеру видеонаблюдения, небольшую метеостанцию, машинку с удаленным управлением и многое другое. Так, Raspberry Pi 3 находит применение в машине в виде видеорегистратора. При желании из данного одноплатника можно сделать даже мобильный телефон или смартфон. Но такое стоит делать либо ради экспериментов, либо, чтобы похвастаться перед друзьями/сообществом. Дело в том, что соответствующее устройство получится как минимум довольно громоздким.

Конечно, для данных целей понадобятся модули. Но с их покупкой проблем не должно возникнуть. В Сети существует множество магазинов, которые продают дополнительные компоненты для "Малины" по доступным ценам.
Объединение нескольких RPi 3 в кластер
Ещё один способ применения Raspberry Pi 3 - объединение нескольких таких устройств в кластер. Это довольно специфический способ использования, который подойдет далеко не каждому.
Для начала следует дать краткое и понятное объяснение, что такое кластер. В общих чертах под этим термином понимается комплекс однородного оборудования (в данном случае множество RPi), на которых параллельно выполняется какая-то задача.
Делать кластер из "Малины" для реализации чего-то серьезного практического смысла нет, так как есть более дешёвые и удобные решения. Объединение Raspberry Pi 3 в кластер целесообразно по большей части для обучения. Имея несколько одноплатников, можно разобраться с особенностями параллельных вычислений или показать как они работают ребёнку (собственно, RPi и создавался для обучения детей).
Как можно видеть, с RPi 3 можно сделать много интересных вещей. В первую очередь он полезен для изучения компьютеров. Но также он позволяет и реализовывать очень большое количество проектов, которые возможно применять для работы или отдыха.

One popular use of Raspberry Pi computers is building clusters. Raspberry Pies are small and inexpensive so it"s easier to use them to build a cluster than it would be with PCs. A cluster of Raspberry Pies would have to be quite large to compete with a single PC; you"d probably need about 20 Pies to produce a cluster with as much computing power as a PC. Although a Pi cluster may not be that powerful, it"s a great opportunity to learn about distributed computing.
There are several different types of distributed computer which can be used for different purposes. There are super computers that are used for solving mathematical problems like modelling weather conditions or simulating chemical reactions. These systems often use the Message Passing Interface (MPI). A team at the University of Southampton built a 64 node MPI based super computer . This system is used for teaching students about supercomputing.
Another technology that"s often used in distributed computing is Hadoop, which distributes data across many nodes. Hadoop is often used for processing large datasets and data mining. An engineer at Nvidia built a small Hadoop cluster using Raspberry Pies . He uses his cluster to experiment and test ideas before deploying them on more powerful systems.
Using a Raspberry Pi cluster as a web server

Clusters can be used as web servers. Many web sites get too much traffic to run on a single server, so several servers have to be used. Requests from web browsers are received by a node called a load balancer, which forwards requests to worker servers. The load balancer then forwards responses from servers back to the clients.
This site is now hosted on a Raspberry Pi cluster. The worker nodes are standard web servers that contain identical content. I just installed Apache on them and copied my site to each node.
I use an extra Raspberry Pi to host a development copy of this site, and to control the cluster. This Pi is connected to my local network via wifi, so I can access the development copy of my site from my laptop.
The extra Pi also has an ethernet connection to the Pi cluster. When I want to update my site, I can transfer changes from the development site to the live site on the cluster. Site updates are put into .tar.gz files which the worker nodes automatically download from the development site. Once downloaded, updates are then unpacked into the local file system.
Configuring the Raspberry Pi servers
All of the Pies in this system are headless. I can log into the Pi with the development site using the Remote Desktop Protocol, and from that Pi I can log into the worker Pies using SSH.
All the Pies in the cluster use a static IP address. In a larger cluster it would probably be better to set up a DHCP server on the load balancer. The IP addresses used in the cluster are on the 192.168.1.xxx subnet.
For each worker Pi, I set up a 4GB SD card using the latest version of Raspbian. In raspi-config I set the following options:
- expand fs
- set the hostname
- set the password
- set memory split to 16MB for the GPU
- overclock the CPU to 800MHz
- enable ssh
On each card I installed Apache and some libraries required by my CMS, libxml2 and python-libxml2. I used this command to enable mod rewrite, which is also required by my CMS:
$ sudo a2enmod rewrite
Finally, I copied some scripts onto each SD card which allow each Pi to synchronize its contents with the development Pi. In a larger cluster it would be worth creating an SD card image with all of these modifications made in advance.
Building a load balancer

The load balancer must have two network interfaces, one to receive requests from a router, and another network interface to forward requests to the server cluster. The nodes in the cluster are a on a different subnet than the rest of the network, so the IP address of the load balancer"s second interface must be on the same subnet as the rest of the cluster. The load balancer"s first interface has IP address 192.168.0.3 while the second interface"s IP address is 192.168.1.1. All the Pies in the cluster have IP addresses on the 192.168.1.xxx subnet.
I built my load balancer using an old PC with 512MB of RAM and a 2.7GHz x86 CPU. I added a second PCI ethernet card and installed Lubuntu, a lightweight version of Ubuntu. I was going to install Ubuntu, but this PC is pretty old, so Lubuntu is probably a better choice. I used a PC becasue I wasn"t sure if a single Pi would be powerful enough to act as a load balancer, and a Pi only has one ethernet connection. I want both of my load balancer"s network connections to be ethernet for improved performance and stability.
Note that IP forwarding is not enabled. The load balancer isn"t a router, it should only forward HTTP requests and not every IP packet that it receives.
Setting up the load balancer software
There are many different software implementations of load balancing. I used Apache"s load balancer module because it"s easy to set up. First I made sure my PC"s OS was up to date:
sudo apt-get update
sudo apt-get upgrade
Then I installed Apache:
sudo apt-get install apache2
These Apache modules need to be enabled:
sudo a2enmod proxy
sudo a2enmod proxy_http
sudo a2enmod proxy_balancer
The next step is to edit /etc/apache2/sites-available/default in order to configure the load balancer. The proxy module is needed for HTTP forwarding, but it"s best not to allow your server to behave as a proxy. Spammers and hackers often use other people"s proxy servers to hide their IP address, so it"s important to disable this feature by adding this line:
ProxyRequests off
Although proxy requests are disabled, the proxy module is still enabled and and acts as a reverse proxy. Next, define the cluster and its members by adding this code:
Balancer manager interface
The balancer module has a web interface that makes it possible to monitor the status of the back end servers, and configure their settings. You can enable the web interface by adding this code to /etc/apache2/sites-available/default:
It"s also necessary to instruct Apache to handle requests to the /balancer-manager page locally instead of forwarding these requests to a worker server. All other requests are forwarded to the cluster defined above.
ProxyPass /balancer-manager ! ProxyPass / balancer://rpicluster/
Once these changes have been saved, Apache should be restarted with this command:
$ sudo /etc/init.d/apache2 restart

when I open a browser and go to http://192.168.0.3 I see the front page of my web site. If I go to http://192.168.0.3/balancer-manager, I see this page in the image on the right.
The last step in getting the cluster online is adjusting the port forwarding settings in my router. I just needed to set up a rule for forwarding HTTP packets to http://192.168.0.3.
Here"s the complete /etc/apache2/sites-available/default for the load balancer:


